
Now that our potted motor has been rewired and is partially back together, we need to put the armature back inside. But first we ought to clean the part of the armature called the commutator. The commutator is the series of copper bars arrayed in a ring. They are what the motor brushes make contact with, and they need to be smooth and clean so that electricity can be transmitted between commutator and brush.
The Singer manuals all say to clean your commutator with nothing more than a pencil eraser, but in practice that’s never worked for me. Perhaps it was a valid fix five or ten years into the life of the machines, but some of mine are from the 1930s and require more aggressive cleaning techniques involving a power drill and some sandpaper. The best thing to use is actually a rubber honing stick, but as I'm guessing most of you don't have access to those, I'll show you how to do this with sandpaper you can find in any hardware store.
But, by all means, first give the pencil eraser a shot; if yours come clean with an eraser, you can save yourself some trouble and skip the rest of this entry. (You’ll know it’s clean, by the way, when the surface looks like a clean penny. It doesn’t have to be completely sparkling, but there ought not be any dark spots.)
First off, here’s a Worst-Case Scenario armature. (Actually I should upgrade this to a Bad-Case Scenario armature--for a truly Worst-Case one, check out this one on the MSMO blog.) This is from a potted motor where someone apparently squirted oil directly down the brush tubes. The commutator is covered in black:

By using a Q-tip and rubbing alcohol, I’m able to get it to the state seen in the photo below. While doing it I have to be careful to use the smallest amount of alcohol possible, blotting the Q-Tips well, so that no excess fluid runs onto the wiring insulation, where it is bound to do some damage. Then I’m ready for the next step.

This is what your normal dirty armature looks like, in a machine where someone has not mistakenly injected oil into it. If it only looks like this, you can skip the rubbing alcohol step and start from here.

What you want to do is get two different grits of wet/dry sandpaper, available at any hardware store: 600 grit for the initial cleaning, and 1500 grit for the final polish.
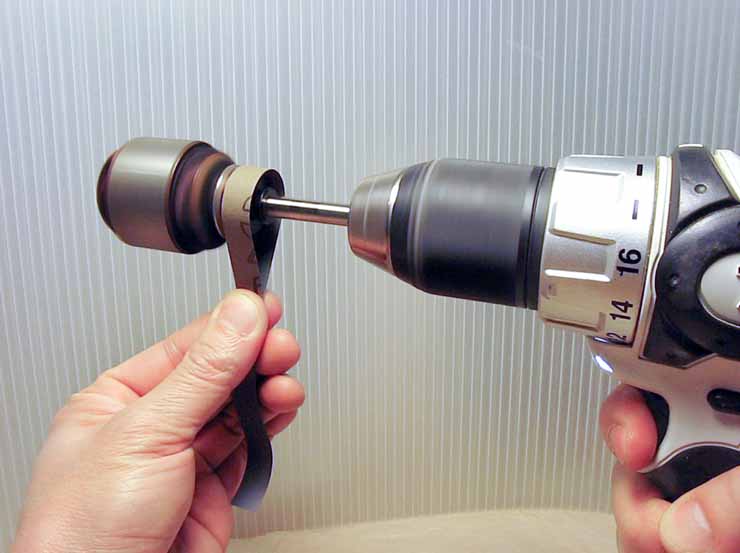
Cut a strip off of each sheet, preferably off of the long side, that is 3/8” wide.

Then insert the shaft of your armature into a power drill, making sure the chuck is then properly tightened, for safety’s sake.

WARNING: If you do not have experience with power tools, PLEASE ask someone more experienced to do this for you. It should be a simple matter for them to follow along with these instructions. If you have never used a drill before and do not properly tighten the chuck, you are setting the grounds for a very nasty accident. So please think twice before doing this. The armature shaft must be securely chucked into the drill, with zero chance it will come free.
The next step is to use the 600 grit sandpaper. What to do is most easily illustrated in video:
You’ll note that in the video, my fingers are quite close to the drill. That is because I’ve done this a number of times and am completely comfortable with it. If you've never done this before, you may want to hold the sandpaper much further down, as in the photo below. Also note that you must pinch the sandpaper together between your fingers quite tightly.

Another tip is, you don’t have to pull the sandpaper downwards with a lot of force; you’re just trying to exert enough pressure that the sandpaper is rubbing the commutator, not grinding it into bits. We’re merely trying to wipe the commutator clean, not actually sand it. The copper comes off quite easily--too easily, as you can see by the copper dust in the photo below--and we want to be careful to remove as little of it as possible.

After our initial cleaning with the 600 grit sandpaper, we remove the armature from the drill. Next we use a plastic implement--I’m using a clay-shaping tool here, but you could probably use a cheap plastic knife--to scrape out the dark gaps between the copper bars on the commutator. This process is called “undercutting the mica.” Use caution so as not to avoid scratching the copper plates, keep your utensil in the gaps.

Here you can see some of the black crap that comes out of the gaps:

I vacuum those away with a brush attachment on my household vacuum.

Then I go back to the drill, this time polishing it with the 1500 grit sandpaper. The process is exactly the same as in the video above.
 |
| Please don't put your fingers this close to the drill unless you've done this a number of times. |
Finally I hit it again with the vacuum, and now we’re good to go. It's as clean as a newish penny, not perfectly shiny, but good enough to cleanly transmit electricity.

Go on to Part 18: Re-installing the Armature and Worm
Yup. That there is a good trick. Fortunately for me, the eraser and honing stick worked just fine on my "Good" commutator. Actually, the Worst case commutator wasn't so bad........the rest of the armature is the problem
ReplyDeleteRain, this tutorial is spot on!!!! Very easy to follow! This is my 2nd potted motor rewire, both on a 201. However I do have a problem cleaning out the dark gaps between the copper bars on the communtator ie "undercutting the mica." Whatever is in there is rock hard. No plastic in the world is going to get it out. Tried soaking in alcohol but no luck. Any ideas???
ReplyDelete