
Folks, we’re now very close to the end. Having succesfully completed the actual re-wiring, your machine should now be up and running in no time. But first we have just a few more mechanical steps to get through.
Now we'll start closing the motor up, in preparation for re-attaching it to the rest of the machine. First, grab the worm, and I’ll show you a little time-saving trick.
Take one of the worm screws and insert it into one of the holes (doesn’t matter which one) and ensure that it’s properly seated. Then, screw it in a little, about three half-turns or so.

Look through the worm to be sure the screw is not intruding into the center.

Then, take the armature (double-checking that the fiber washer is on the shaft, where it’s supposed to be) and insert the armature shaft into the bearing just a half-inch or so. We stick it in just enough so that it stays in place. (Please orient your motor as in the photo above, with the motor information tag facing you, so you can easily follow along here.)

Next, grab some forceps or tweezers, anything you can use to hold the worm steady.

Then insert the worm back inside the housing, between the two bearings. It’s not going to stay there by itself, so you need to hold it steady in what you can only guess is the right position.

Once you think you’ve got it centered between the bearings, push the end of the armature the rest of the way in. It may require several tries to get the worm centered in the right spot, so be patient.
 |
| Note that I push from the center, so as not to touch the exposed copper wiring. |
Once you feel the armature slide into the worm, push it all the way inside. Then use one if your fingers to spin the worm until the open screwhole is facing you, and you can see the armature shaft inside.

Place one finger on the worm to hold it steady, with the empty screwhole facing you, while using your other hand to rotate the armature. Keep your eyes on the empty screwhole as you do. We need to spin the armature until we see the flat part of the shaft appear in the empty screwhole.
 |
| Spin the armature... |
 |
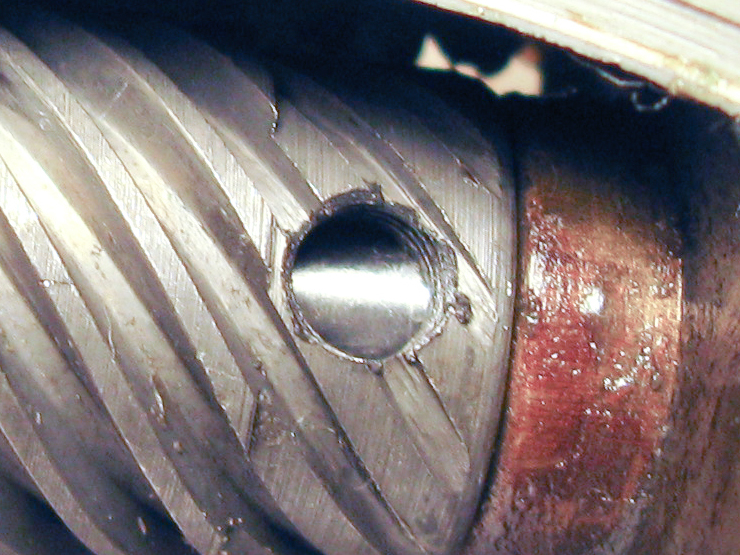
| ...until you see the flat spot through the screwhole. |
Here are some blow-ups so you can tell the difference:
 |
| Here, through the hole, we see the regular, cylindrical part of the armature shaft. |
 | |
| But here, we see the flat part of the shaft. |
Now, here’s the tricky part: While keeping the hole directly over the flat part of the shaft, take the missing screw, insert it into the screwhole, and tighten it down. While doing this, keep the fingers of your left hand on the armature to hold it steady, preventing it from rotating.

It’s tricky because the worm may wobble a bit while you’re doing this, but be patient and tighten the screw slowly while doing the best you can to keep everything in place. Eventually you’ll feel the tip of the screw make contact with the flat spot on the armature shaft, assuming you've kept the worm correctly positioned, and then the worm will stop wobbling. Then, tighten the screw down quite securely.
Next, spin the worm & armature (which should be moving together by now) so you can see the other screw, and tighten that one down all the way as well.
Once that’s done, you’re good! The armature and worm are now connected.

Go on to Part 19: Re-installing the Brushes and Grease Wicks, and Refilling the Grease Tubes
So the worst case scenario here would be a broken or chipped worm gear? I have only heard of rumors of the "fibre gears" breaking. How many machines have you seen this happen on? And is there a replacement part for this type of worm gear? Seeing that there is more 15-91's and 201-2's available for sale than the belt driven versions, I'm assuming it doesn't happen very often?
ReplyDeleteThanks for your help.
The answers to your questions are no, none, no, and that's not why--it's because they were more popular than the belt-drivens in the United States.
ReplyDeleteHow important is the second set screw on the worm? Any idea where I could find a replacement?
ReplyDeleteThe answer is: Very important. You'll never find an extraneous part on a vintage sewing machine--every part is on there for a reason.
DeleteAs for replacements, your only source will be getting one off of another machine. Google a guy named Duane Sechser, he has a stockpile of vintage Singers and should have the part you need in stock.
Nicholas a wonderful pictorial on the worm gear replacement. I have done the same with only a few differences. When putting the worm gear back in I put both screws in as you have done with one. I drop the gear into the location and us a Phillips screwdriver to come in from the open area where the oiling cap is and locate the gear on the screwdriver and set the tip end on the shaft as it is inserted and easy as pie the shaft goes right through the gear while I bring out the screwdriver. Then to get the little screw on the flat spot on the shaft you will notice on the armature side of the shaft a half moon shape (seen clearly on the picture with gloved fingers separated to spin the armature) the flat part of the half moon correlates to the flat spot on the shaft then you cinch down the little screws accordingly.
ReplyDelete