
With the armature and worm back in place, we’re now ready to install the final items: The brushes and grease wicks, and then we'll re-fill the grease tubes, as seen above.
We’ll start with the brushes.
Old Brushes or New Brushes?
If your brushes are clean--meaning you’ve wiped them down with a napkin to remove loose grit and no previous owner has mucked them up with oil or grease--and 3/8” or longer in length, it should be fine. Once a brush gets down to 1/4" or less in length, it needs to be replaced.
With brushes that have been ruined by oil, I’ve read that some people use a flame to burn the oil off of them or otherwise clean them, but I do not have any experience in this area and cannot offer guidance as to whether it’s appropriate. I simply play it safe and replace them.
On that note, a motor expert whom I met in Ray White’s class told me he always replaces the brushes, no matter what.
Where to Get New Brushes
I order my replacement brushes from Jenny at Sew-Classic (here's a link). You may also be able to find replacements in your local hardware store; the dimensions you’re looking for are 3/16” by 3/16” square, and 3/8” or 1/2” long. You can also bring your old brushes down there to match them up.
Installing the Brushes
I’ve often read that people mark the orientation of their brushes when removing them from the motor, in order to be sure they go back in the same way. I don’t think this is necessary; now that you know what a commutator looks like and where it is inside the machine, it’s easy to tell, at a glance, how your brush should go into the machine.
First off observe that the end of your brushes (unless they’re brand-new, I’ll get to that in a sec) have curves worn into them.

That curve is worn into place by the brush riding on the commutator’s curved surface.

And even when the commutator's tucked out of sight inside the motor, the very shape of the potted motor housing echoes that curve.
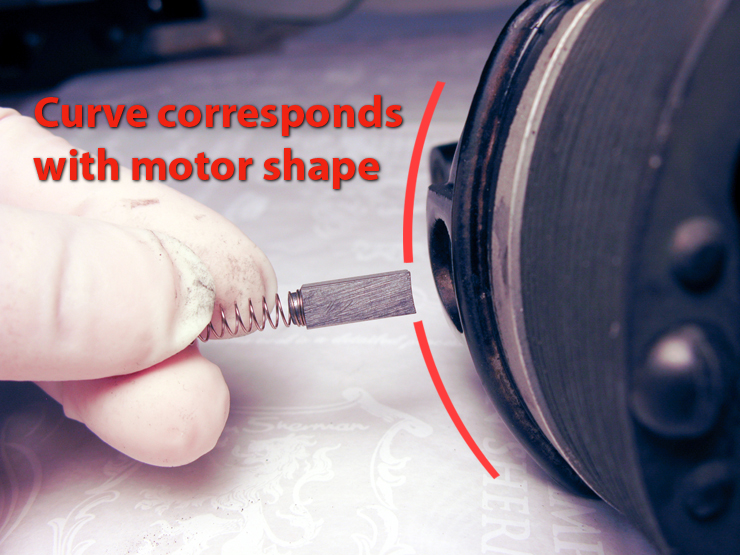
So, it’s pretty easy to figure out which way the brush goes in; just make sure the curves match up.
As you’re inserting your brush into the brush tube, which we cleaned out earlier, be sure that the brush slides freely in the tube. If you feel it stick, don’t force it in--stop what you’re doing and remove the brush. You’ll need to do a better job cleaning out that brush tube.

Once your brush is inside, screw the brush tube cap on, ensuring that the spring is centered in the cap.

I tighten these caps very gently, since they are made of Bakelite and easy to break.

If your brushes are new, they may be completely flat on the ends. In that case you just insert them, and later you’ll run the motor for a few minutes to wear the brushes into the appropriate shape.
Once you’ve installed the brushes on both sides, we move on to the grease wicks.
Grease
Obviously you’ll need some grease. Be aware that all grease is not the same, they have different viscosities. What you want is specifically Singer-brand grease. If that is not available, you can actually use Vaseline or petroleum jelly, as that is the proper viscosity as well. (I would not recommend using Tri-Flow grease, which is impregnated with Teflon, and there’s debate as to whether the Teflon clogs up the wicks, preventing the grease from getting into them properly.)

In the photo above, below the Singer tube is a syringe from Jenny at Sew-Classic that I’ve loaded up with grease. The syringe is not strictly necessary, but I find it much more convenient to use, and now I’d rather not go back to not using one.
Installing the Grease Wicks
Now we turn to the grease wicks themselves. Here you can see I’ve “screwed” new wicks into the springs, and you can see the topmost one features the spring I mangled out of shape when removing it.

I have tried--and failed--to restore that spring to its original condition, which is okay here because the exact tension of the grease wick springs is not crucial. What you want to do is cut the new grease wicks to be about 3/4" in length, and screw it into the spring far enough that the overall length is about 1 1/8”.
Once that's done, I dab just a few droplets of grease on the business end of the wick, as it will take some time for them to properly absorb the grease we’ll fill the grease tubes with, and I’d like a little lubrication on the shaft from the get-go.

Next I insert the grease wicks into the tubes. Be sure to look inside the tubes first to locate the holes in which to place the wicks.

Following that I place the retaining clips on top of each spring, oriented as in the photos. (Left and right are mirror images of each other.) Be sure the tab on the clip completely covers the spring.


 | |
| Note that the tab completely covers the spring. |
Then, using my forceps, I very gently squeeze the part of the clip encircling the spring. This temporarily bends the clip into itself, just slightly, so that you can slide it down into the tube.


Push the clip down so it’s at least past the first few screw threads carved into the side of the tube. You don’t have to shove the clip down all the way; later when we screw the caps in, the caps will push the clip down to the appropriate place.

Next I use the syringe to load the tubes up with grease.

You don’t have to go nuts here, just fill the empty spaces with grease, as shown in the photo. If you put in too much, it’s going to squirt out onto the caps when we screw them on, and we don’t want to do that.

Now we screw the caps in. If you can’t get a good grip with your fingers, don’t forget you can always use a penny to tighten them.

Next we pop the motor cover back on, and tighten the screws.

They don’t have to be terribly tight, so don’t knock yourself out; the chances of the motor cover vibrating off of the machine are slim.

We’re almost ready to go!

Go on to Part 20: Hooking It All Back Up
Thanks, Rain-- as soon as I have space (in a couple of weeks) I will order the parts and give this a try. My 15-91 came with the motor taped where one of the screw caps should be, and I don't want to run it until it's fixed.
ReplyDeleteThumbs up, Rain. Thank You
ReplyDeleteDiana in CNY
Absolutely superb series - your pictures & detailed explanations make this a Priceless Gift - thank you. :) :) :)
ReplyDeleteNicholas,
ReplyDeleteHi this is Steve in Hemlock, NY.
My daughter had me rewire the motor on her 1941 201-2 made in NJ. She pointed me to your site and I have to tell you your explanations were perfect. I'm not a green horn to mechanics or electrical but you did an awesome job of the ground work for success.
My mom had the same machine growing up and you never forget that sound.. Hers did not have the the scroll work on the silver plate but straight vertical lines.
It truly is a shame this country doesn't build that same quality our country used to be famous for..
Thanks,
Steve
Hello, I'm doing a rebuild on my 15 91. Where or what spring did you use to replace the damaged spring for the wick.
ReplyDeleteThanks, KC