
This is the last thing we need to learn before moving on to the machine! Congrats if you’ve made it this far.
After we eventually solder new wires onto the motor leads, inside the motor housing we’ll need to tie those new wires into what’s called an underwriter’s knot before we push the wires out through the housing.
An underwriter’s knot provides strain relief, so that if we tug and pull on the wiring while we’re installing the motor, it will not place any stress on the motor leads where they join with the motor’s field core. (The knot will simply catch on the inside of the housing.) This is very important, because if you break that connection at the field core, your potted motor then becomes a potted paperweight.
We’ll practice outside of the machine to be sure we can get the knot right. Ready?
Let’s start by cutting two eight-inch lengths of wire. Use a different color for each to avoid driving yourself nuts.

Photographs will best illustrate what to do next:
 |
| Step 1 |
 |
| Step 1 detail: Ensure you've crossed OVER the wires |
 |
| Step 2: Ensure the other side crosses UNDER the wires |
 |
| Step 3: Through the loop on the left (from front to back) |
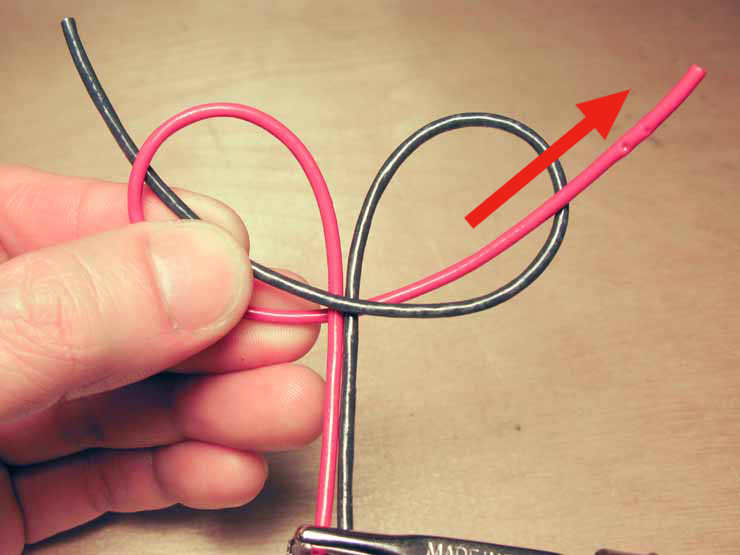 |
| Step 4: Other wire goes through the loop on the right (from back to front) |
 |
| Step 4 detail: Double-check that the appropriate sides are over or under each other, as shown in the blue circles. |
 |
| Same photo as above, but without the distracting blue circles. |
 |
| Step 5: Don't tighten all the way; make it just tight enough that the wires don't slip out of the loops. |
We're keeping it loose for a reason. Because here's the real trick to getting this right once we're doing this inside the actual motor: We have to learn how to move the knot downwards. This is easiest to do by keeping the knot loose, then moving it downwards as we tighten.
Here's the loose knot. I've place it exaggeratingly high up, about three inches from the bottom of the wires, for the purposes of illustration:

As you begin to tighten it, move the knot downwards. You will have to do a little bit at a time, working on each side in turn. Don't tighten too much, keep it loose enough that you can continue to move the knot to where you want it.

There's no way for me to illustrate the knot-moving process in photos or video; I tried and my fingers block the view of the wires. It's just something you have to monkey with, and you'll eventually "get it."

Here you can see we've got the knot all the way down near the bottom.

We ultimately want to be able to get it so there's only 1/2", or maybe 3/4", of wiring left underneath the knot.

Then we can tighten it. You don't have to get it super-tight for now.

You may wonder why we're doing it this way. It's because there's not much room once we're inside the actual motor, and being able to move the knot will prove useful to ensure everything fits inside the housing. Don't worry if you don't understand what I mean by this, it will all become clear once we're actually doing it.
Next we'll finally get our hands on the actual sewing machine. But don’t get too excited yet, because chances are as we begin disassembling the motor we’re going to have a ton of cleaning to do as we go.
Go on to Part 7: Disconnecting the Motor Leads
Very useful info. thanks for the share
ReplyDeleteThis blog is just wonderful. I just purchased a 201-2 (1940) that needs re-wiring and a good cleaning / oiling. I'm reading this entire blog first, making notes, etc. This blog is like a good novel!
ReplyDeleteI've already purchased my Chapman screwdriver set, and I've ordered many other items to get to work on giving my 201-2 the salon treatment! Thank you, thank you for all of this information. It is so EASY to follow with how you write and the illustrations provided. You are a Godsend!