First we covered How to remove the bobbin case, then we went over How to remove and replace the rotating hook assembly. Now that we've got the hook assembly area nice and spiffy, time to get everything back together. You may have heard that it's difficult to get the bobbin case and retaining ring back together, but you're going to be thrilled with how easy this is. First, put a drop of oil in the hook assembly, on the little track where the bobbin case will ride.
Then drop the bobbin case back in.
To be sure the bobbin case is seated correctly, you can move the little "shark fin" part to the left and right, ensuring the bobbin case rotates smoothly.
Now we turn our attention to the Retaining Ring. I've used a magic marker to put a red dot on it in a very particular place, where the outer edge of the ring starts to curve inwards. You don't have to do this to yours, though it may help; I've done it here for the purpose of illustration.
Now take a look at the hook assembly. There are two clips, but there's only one we're worried about: The clip that has a screw to the right side of it.
What we want to do is take the Retaining Ring, and place it on top of the bobbin case...
...in such a way that the red dot is lined up with the clip. (You might need to move the bobbin case's "shark fin" out of the way to get the ring in position.)
We are NOT snapping or clicking the ring into position, we're just resting it on top of the bobbin case with the red dot lined up with the clip. There's no force required, you're just dropping it into this position.
Next, reach back with your left hand and grab the balance wheel so it doesn't move.
Then, take the little silver Singer screwdriver...
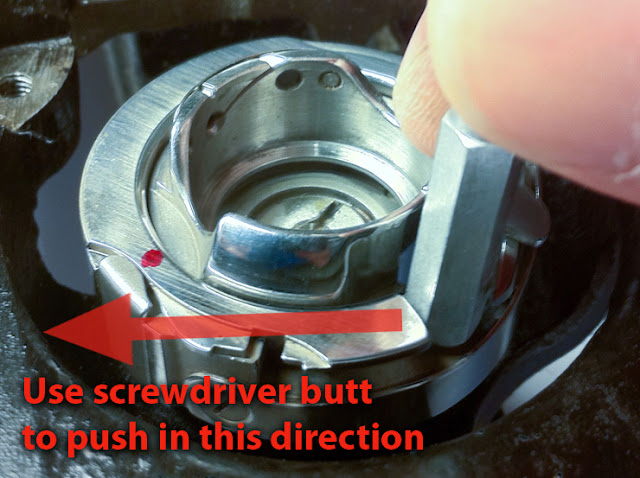
...and stick the butt end of it down next to the butt end of the Retaining Ring.
Now, use the screwdriver butt to push the butt end of the Retaining Ring, as shown in the photo below.
The Ring will rotate slightly, then click into place.
Now the Retaining Ring is securely holding the bobbin case in place. Rotate the "shark fin" around a bit to be sure everything's turning smoothly.
Next, take the Position Plate and screw it back in. When you do, make sure the "shark fin" is located like you see it here:
Well, that's pretty much it. Reattach the feed dogs and the needleplate, and you're good to go.
Once you've done this several times, you won't need to remove the needleplate, feed dogs or position plate. You might have to rotate the handwheel to get the pieces in position for you to manipulate them, but it's very do-able.


I have a couple of 201's that I'm going to try this on. Thanks so much for wonderful pics and instructions!!
ReplyDelete~Cathy in MA~
Wow! You made this look so much clearer than the Singer manual. I took my bobbin case out to clean it 3 years ago and it took me 3 days to figure out
ReplyDeletehow to get that blasted thing back together again.
Much angst and gnashing of teeth...bad language too.
PLEASE help me. I can't change the bobbin on these sewing machines!! I a new bobbin in but don't know how to get the thread to come through so I can start sewing again :(
ReplyDeleteNicole
Oh, thank you for this! I needed a picture with the ring out to see where to put i back, and the click! I didn't know about the click! Lovely tutorial.
ReplyDeleteThank-you for writing up this tutorial, it was just the thing I was looking for after I'd managed to take the bobbin case out but couldn't figure out how to put it back together again. =)
ReplyDeleteTHANK YOU, THANK YOU, THANK YOU! :)
ReplyDeleteThank you so much, it was very helpful!
ReplyDeleteThis tutorial is most clear and accurate ,to the point of perfection, thank you very much .
ReplyDeleteFantastic tutorial! I got nowhere using the manual ~ picture was so tiny. Your pictures made it so easy! Thanks for all your helpful instructions.
ReplyDeleteThank you so much for this tutorial. I have just followed all your instructions and removed, cleaned and replaced all the bobbin parts on my 201. I would not have attempted this without your tutorial.
ReplyDeleteThanks so much for this blog, I've been working on my grandparent's 201-2 to make it usable and without your photos and info I wouldnt have gotten very far. My grandpa broke the fin off his bobbin case so now I'm on a trek to find a new one :-)
ReplyDeleteYou are wonderful. I have torn my hair out over getting that darn ring re-seated properly. Thank you so much.
ReplyDeletetotally amazing directions and pictures!! I was trying to remove and replace the bobbin case using online directions from the manual!!! Thank you so much....every one of your detailed comments were helpful, including how things might be stuck a little.
ReplyDeleteExcellent!
ReplyDeleteJim UK
Thanks so much for this picture tutorial! I had figured how to take it apart without reading your blog, but for the life of me I could not figure how to seat it back in! You saved me. . . .thanks again.
ReplyDeleteThank you thank you thank you! This is the second time I've returned to your blog when I was having trouble with my Singer. Your clear pictures and explanations are so helpful!
ReplyDelete