
Up top is a Singer 201-2, a 206, a 15-91 and a 221 Featherweight. They all use the same feed dog screws and needleplate screws. You'll want to remove your needleplate and feed dogs pretty regularly to clean out all the lint that gathers underneath them. Now let's talk about how to easily get them off.
In the last post, I wrote about how the arm of the machine makes it impossible to get a screwdriver straight into the needle plate or feed dog screws. Even the stubbiest screwdriver just won't fit. That doesn't stop other people from trying (and failing), so inevitably you'll see these machines with partially stripped screws.
If there's any purchase left in the screw at all, here's two tools you can use to get those screws out. (If they're already too stripped, you'll have to take it to a pro.)
 |
| NOT my first choice |
These offset screwdrivers are made by Tuff Stuff, which is not a tool company you hear people rave about, but I bought 'em because they were hollow-ground and the only thing my local hardware store had (just under $10, probably cheaper near you since NYC is expensive). I don't like these but I include this review because they're common and might be the only thing you can get locally, depending on where you live. I see these all the time in Mom-&-Pop hardware stores, they sell them both in a single pack.

Amazingly, the larger one is a good fit for a Singer needleplate screw, and the smaller one is a decent-enough fit for a feed dog screw. I was worried the steel on these tools would be soft and cheap, but surprisingly they got even stuck screws off without losing material or slipping.
When using offset screwdrivers, you don't just stick 'em in the slot and turn. You have to provide a lot of downward pressure on them, particularly if the screw is already partially stripped.

Press down very hard where the arrow is, as if you're trying to push the screwdriver right through the screw. You really have to drive it down into the slot, particularly if the screw has been overtightened, as I often find them.
 |
| Keep the shaft going straight into the screw. |
 |
| Don't let it tip at an angle! Danger of stripping or slipping! |
I only use this driver to break the screw loose, not undo the whole thing. Using offset screwdrivers under the sewing machine arm are a pain because you can only turn it a little, then you have to keep resetting it and turning it. So after breaking the screw loose, I use a properly-sized Brownell bit, which is so long that you can use the bit itself as a mini-screwdriver. (If you've never heard of Brownell bits, don't worry, I'll cover them in the next entry.)
 |
| Using the bit as a mini-screwdriver makes the job quicker. |
Now, here's the tool I actually recommend:
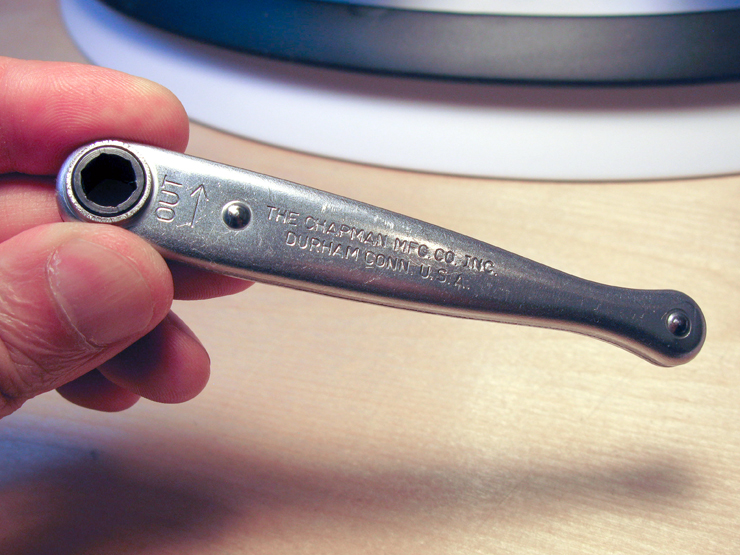
This is a small ratcheting handle made by Chapman tools. They come in Chapman's screwdriver bit sets, but you can also buy them individually. The cheapest price I've seen for these is on Amazon, $4.25. Here's a link:
(Husky also makes one that I've seen at Home Depot for $6.99, but I've never used it.)


I like this ratchet better than the offset screwdriver because you just stick the bit you need in there, and you can pop the bit out, rotate it, and put it back in if the screw slot is at an inconvenient angle. If you don't know what I mean by this, it will become clear when you're actually trying to take the screw out.

As with the offset screwdriver, provide a lot of downward pressure along the shaft of the bit to keep it firmly seated in the screw. Once you've got that downward pressure going, you can start turning the handle to break the screw loose.


Again, after the screw's loose, you can get rid of the handle and just use the bit to unscrew it the rest of the way.
Looking at the bottom of the feed dog, you see why it's a good idea to regularly take it off and clean it. This lint gathered after I sewed just two pairs of boxer shorts; you can imagine how much would be under there if you're sewing, say, a quilt.


Here's a tip for when you put everything back together: I've found it's okay to tighten the needleplate screws just using the bit, which does not provide the same high amount of torque as if you tighten it with the ratchet or offset screwdriver. But the feed dog screws are a different story--those have to be tightened down using the ratchet or offset screwdriver. Every time I've tried tightening the feed dog screws using just the bit, when I start sewing, the vibration of the machine eventually causes those screws to start backing out by themselves and the feed dogs become dislodged. Obviously this will lead to trouble, so keep those feed dogs screwed on tight.
Next I'll cover some different companies that make bits, where you can get them, which bits you'll need, and why it might not be cost-effective to buy a whole set.
Go on to Screwdrivers, Part 3: Which Set Do I (or Don't I) Need?
Great tips!... but now I have to go buy a ratchet driver.
ReplyDeleteYou've got a Home Depot near you, no? If you end up picking up that Husky, please let me know how it is.
ReplyDeleteHome Depot is a bit far. I did stop by Lowe's Hardware and they don't sell individual 1/4'' ratchets. They had them in a kit, but they no longer carried the ratchets separately. After working on my 66-16 this weekend, I can see many uses for this ratchet. Great suggestion!
ReplyDeleteMy Dad had one of those mini-ratchets. I know, because I used it when I put some coffee-table legs on a bed frame. His tools have become jumbled, especially since his passing, so I no longer know where the mini-ratchet is. I need it again, so that I can now take the legs back off of the bed frame.
ReplyDeleteIt should still be around somewhere, but maybe I should buy one of my own. That way I can use it when I give my Singer sewing machine a tune-up.
What a great set of tools - I am a great gadget buyer, but I have never come across those rachet setson England.
ReplyDeleteThank you so much for sharing your knowledge, I am most grateful.
ReplyDeleteThank you so much - I was cleaning my new Singer 222k and I had a frozen screw on the feed dog plate. I could not get it to budge. I found your article, bought the Husky mini ratchet at Home Depot and the screw came right out. Unbelievable! Thank you again for all of your hard work in documenting/recommending. Blessings
ReplyDelete