
Okay folks, today I'm going to show you how to get those pretty gold numbers back onto the stitch length indicator plate, so you can actually read the darn thing. Here's your typical "attic fresh" 15-91 that's seen better days:

The stitch length indicator plate's numbers have been worn away by time, making the numbers illegible.

Go to an art supply store and pick up some gold paint. The smallest tube you can find, because it doesn't take much. Make sure you get acrylic paint--not oil, not watercolors, not pastels, nothing but acrylic. Acrylic won't bond to the metal plate, which is what we want, for it not to bond. You'll see why. Here's the brand of paint I bought.

I wasn't sure which type of brush to use, so I bought three different kinds: A pointy brush, a fluffier pointy brush, and a wider flat brush. Yes it was a waste of money buying all three, but I knew I'd print the results here, and tell you the right brush to use after testing them all out, so at least I saved you a few bucks.
 |
| I put the quarter in the picture both to demonstrate scale and my vast personal wealth. |
Remove the SLI plate. It comes out with two screws, top and bottom, then unscrew the silver knob. You can take the screws and throw them in the carpet somewhere, or carefully place them in a jar for safekeeping. Guess which one I recommend.

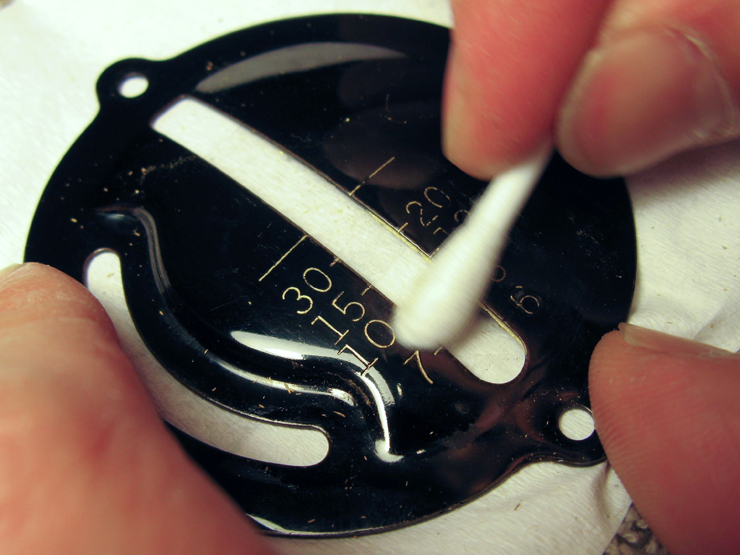
Next, clean the surface of the plate. I used just a Q-tip and water because it was already decently clean. If it's covered in oil or grease, you'll need to clean it with a solvent like kerosene (or lighter fluid, which is the same thing but a bit easier to manage). Do not use rubbing alcohol, it will take the paint off.

Once the plate is clean and dry, we can get down to painting. The flat brush is the right one to use. You don't even need to squeeze the paint out, just dab the brush on the tube and save yourself a step.

If you're a klutz like me and you got too much paint on the brush, just wipe it off on something unimportant, like an envelope or your roommate's birth certificate.

Now we start slapping the paint on. Move quickly--we're not painting a Picasso here, just laying down a quick, thin layer of gold over the number depressions. I find it easier to do one side at a time.

Immediately after applying the gold, take a clean Q-tip and gently wipe it across the surface, back and forth, turning it often and working quickly. Do not press hard, but work fast. It's better to do 100 fast-and-light strokes than 20 strong-and-hard ones.

At first it will seem like the paint is not coming off, but within 30 seconds your strokes will begin to pick up the paint. The reason you don't want to press hard is because if you do, you'll dig the fresh paint right out of the number grooves. You just want to gently wipe the stuff off of the top and let the paint settle in the grooves underneath. Fast-and-light, fast-and-light, keep at it and don't press hard. Keep changing to clean Q-tips as they get loaded up with paint, otherwise you'll undo your own work.

While you're cleaning off your first coating of paint, it will look like crap, like in the photo below. The numbers are only partially filled in and it looks terrible so far, but don't be discouraged.

It takes several coats for the paint to sink into the number grooves and fill them evenly, so after you've wiped off that first coat, apply another, and repeat the whole process.

After about four coats and a lot of wiping, it starts to look like this shot, below. The numbers are starting to pop, no?
By the time you're finished, you'll probably have built up a lot of paint on the inside edge of the slot, as seen here. Don't forget to Q-tip that off too.

Acrylic dries pretty quick, so you can put the plate back on your machine just about immediately. Here's a before-and-after shot:
Not too shabby, huh? And now you can actually read the numbers without having to stick your face right up on the machine.
this is great nick, i will be trying it on mine, though i probably have some other issues to resolve with this machine. But this is good for encouragement and self steem.Thanks Marisa
ReplyDeleteI have been straining for years to read the numbers on my 201. This is just a great way to improve a great machine. JEC
ReplyDeleteFabulous Info! I thank you, and my little herd of vintage Singers thanks you! This promises to be one very fine blog, & I look forward to more :) :) :)
ReplyDeleteGreat idea! I used white out on mine . .. not the best thing, but at least I can see the numbers. Kinda wishing I would've thought about using gold paint, though!
ReplyDeleteThanks for the very helpful tutorial!
ReplyDeleteBrilliant idea! I was going to ask you how I could restore the numbers on my 201 - glad I saw this post first!
ReplyDeleteHI Rain,
ReplyDeleteThanks !!!!!
Thanks for the tutorial. It will help restore my 15-91 so I can finally read it.
ReplyDeleteThis is amazing!!!
ReplyDeleteJust wondering if this would work on all the rest of the decals. I can't wait to try this. I just got a 15-91 and it needs so much work. The power cords have been cut and I am just trying to get it cleaned at this point. I would love to restore it. This will be my first step in doing so. Thanks!
ReplyDeleteI love this blog. You give great advice and have fantastic pictures. I'm just getting my 201-2 running, and found the tutorial on putting the bobbin case back together a real life saver. Thanks
ReplyDeleteYour tutorials is an great gift to all vintage sewing machine junkies. My machines are in tip top order because of you.
ReplyDeleteThanks Esse
Great blog! I didn't think mine had numbers!
ReplyDeleteIt was so disappointing when I got my machine and I notice that the paint in the numbers was gone. But Thanks so much for this tutorial. They look great!!! I'm so happy and I'm so glad I found your blog. Please keep posting.
ReplyDeleteBest regards
Fantastic!
ReplyDelete