
You will need the correct tools: A screwdriver with good bits, and the small, silver Singer screwdriver (pictured up top) that came with many machines.
If you don't have the Singer screwdriver, find the tiniest flathead (slotted) screwdriver you can find. To see if it's the right size, take out a dollar bill. See those letters at the top of the bill that say FEDERAL RESERVE NOTE? The width of the screwdriver blade's edge should be about the same height as those letters, as seen in the photo below. If it's much smaller or bigger than the letters, it will probably not work. (Update: If you don't have U.S. money to check with, click here.)

People probably find 201 bobbin case removal difficult because they don't know what the separate parts look like. When I looked down at the hook assembly for the first time, I couldn't tell where one part ended and another began, so I didn't know what the heck I was supposed to be removing, and the drawing in the Adjuster's Manual was too small for me to make anything out. So here I'll use huge pictures to explain. Note that in the photos, I have the machine pointed towards me.
The first part of the hook assembly you are going to be removing looks like this:

The Retaining Ring is held in place on the assembly by two little clips on either side, like two hands reaching up to hold the brim of your cowboy hat onto your head on either side. The Retaining Ring holds the bobbin case in place, and after we remove it, the bobbin case can be lifted out.
Once you get good at doing this, you won't need to remove the needleplate, feed dogs and position plate (though you may want to for cleaning). But we'll remove it in this tutorial to make things easier.
I've removed the needle and presser foot for visual clarity.

Next I remove the slide plate and the bobbin.

This machine was just acquired and the previous owner has left a thread tangle. Pull every last bit of thread out.

Then remove the needleplate and feed dogs. If you need instructions for how to do this, click here.

Now you see this bar, called the Rotating Hook Bobbin Case Position Plate.

Undo the two screws and take it off. (Again, you won't need to once you get good at this, but it will give us more room the first time.)

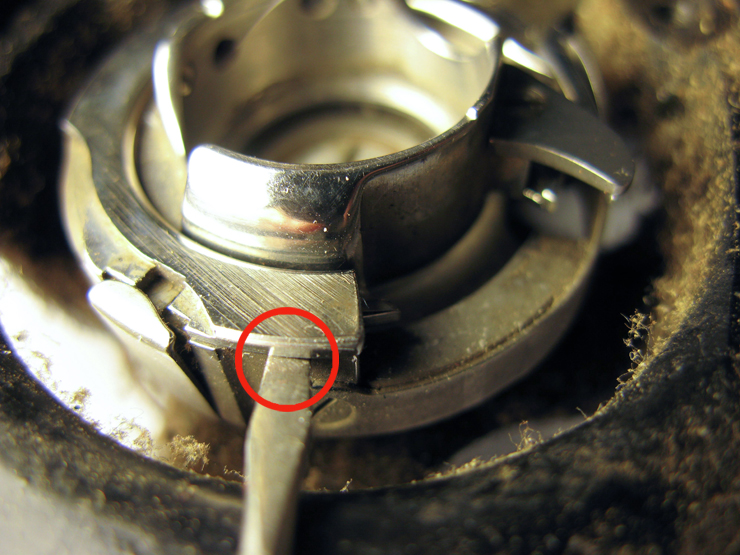
Now we're ready to get down to business. The Retaining Ring has a butt end, as we saw in an earlier photo. Look for it and recognize it. Also look for and recognize the two clips. If you don't see these parts, rotate the handwheel until you do.

The clip near the butt end has a little notch next to it. In the photo below, I've rotated the handwheel to move everything around so you can see it better.

Stick the blade of the Singer screwdriver in that notch.

Then rotate the screwdriver clockwise, just 90 degrees, while pressing the screwdriver gently downwards.


Once you've rotated the screwdriver 90 degrees and pressed down, the clip moves outward. It should look like this:

Now take the little screwdriver, and stick it under the edge of the butt end of the Retaining Ring, like this:
Here's what it looks like from a side view:

Next GENTLY push down on your end of the screwdriver, using it as a lever, so the blade end of the screwdriver goes up. Be gentle, you don't have to move the screwdriver very much at all. You are NOT trying to pry the Ring off, just moving it up a millimeter or two to free itself from the clip. With gentle pressure it will free itself from the clip with a soft click.


Now the Retaining Ring is sitting on top of the clip, not under it anymore.

Almost there. Now, with your right hand, reach over to the back of the machine and hold the balance wheel steady, so that it doesn't move.

With your thumb and forefinger of your left hand, grasp the Retaining Ring.

Then just rotate the Retaining Ring counterclockwise ("to the left"), very slightly. It will free itself from the other clip with a quiet click.

That's it, now you can take it off. (You can do it with your fingers, but I removed it with tweezers here because my fingers were too big in the photo for you to see the Ring.)


Now the bobbin case can be lifted out, easy peasy.

Next, all you've gotta do is clean out the race with a Q-Tip. Have fun!

When you're ready for the next steps, click over to How to remove the actual rotating hook, especially if there's a lot of junk under there that needs cleaning out; then check out How to get everything back together.
Thanks Rain, Awesome directions - I have two 201s waiting out in the barn for me to play with and I know these directions are going to come in very handy. I have never removed a bobbin case before. Thanks again, Ashley
ReplyDeleteThanks so much - your photos really tell the story perfectly. Looking forward to your future posts.
ReplyDeletePat - just east of the Coast Range
Fantastic job at illustrating each step. I and I know others really appreciate your time and effort in preparing this! Thanks so much, Sherry
ReplyDeleteNot many people can give such clear directions, and the photos are fantastic. You didn't leave any detail out, and you have just saved me a world of frustration. I thank you from the bottom of my heart.
ReplyDeleteThank you so much!
ReplyDeleteYou are amazing and always very timely with your well written and photographed instructions. Thank you for your time and bravery to just jump in!!
ReplyDeleteThank you. This was the ticket. So well explained and illustrated. Most excellent instruction! A++
ReplyDeleteWow, 28 photos to show how to do this. Wonderful.
ReplyDeleteThank you so much for providing this info. Awesome!
ReplyDelete